I wanted to write a post/series on something that I knew about, but never had the opportunity to actually do in a Production environment; monitoring Linux/UNIX servers using System Center Operations Manager (SCOM).
All of my experience has been in a Windows-based environment. Even though the environments I have worked in did have some Linux/UNIX systems, these were not within my realm of jurisdiction, and therefore I could not install the SCOM Agent on these servers.
So, what better way to gain experience with something, than doing some research, and trying it out. Here it goes. Let’s start with setting up a Linux server. In my lab I’m running Hyper-V, so I will setup a Linux VM to work with.
The first thing that you need to do is choose an appropriate Linux/UNIX distribution. System Center Operations Manager supports multiple versions/editions of Linux/UNIX, but it doesn’t support ALL versions. Here is the link for the Supported UNIX and Linux Operating System Versions, specific to System Center 2012, 2012 SP1, and 2012 R2 Operations Manager.
Review the list, and choose a version you would like to work with. If you are not familiar with UNIX or Linux at all (like myself), I have read that it SUSE Linux Enterprise Server 11 is easier to work with because it has setup wizard, which we Windows-IT folk are more used to.
Now that we have chosen a Linux distribution to use, SUSE 11 in my lab example, we have to obtain the files necessary. Go to the SUSE webpage and navigate to the SUSE Downloads page. In their Basic Search tool, select the appropriate options to find the download. At the time of this writing, the latest version of SUSE is version 11 SP3.
IMPORTANT: You will need to register for a free account before you will be allowed to download the ISOs.
After you have downloaded the ISOs, we need to create a VM to install it onto. I’m not going to detail how to create a Virtual Machine (VM) in Hyper-V; but if you do need me to detail/document that piece, please email me and I will add it. On my VM, I have mounted the first ISO, and then powered on the VM.
Setup/Installation of SUSE Linux
NOTE: Within the SUSE VM, use the up and down arrows and the Tab key to navigate around, and the Enter key to accept or confirm a selection.
On the setup screen, highlight the Installation option, and then press Enter.
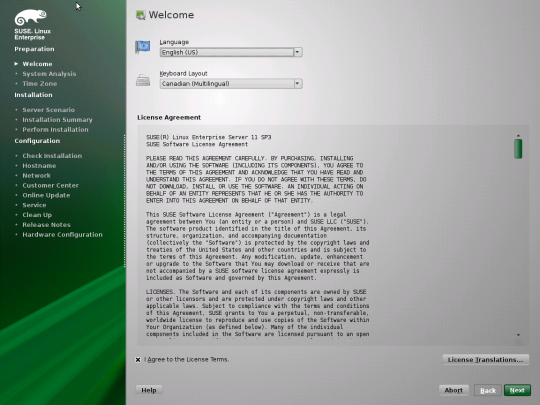
Once the OS loads, on the Welcome screen, change the Language and Keyboard Layout options as desired, then click Next.
On the Media Check screen, click the Start Check button to check the files contained on the ISO. Once the check has completed successfully, click Next.
After the System Analysis runs, you will be on the Installation Mode screen. Choose New Installation and then click Next.
On the Time Zone screen, make the appropriate selection for Region and Time Zone, then click Next.
On the Server Scenario screen, select the “Physical Machine (also for Fully Virtualized Guests” option, then click Next.
One the Installation Summary screen, review the information displayed, and then click Install.
On the Confirm Package License screen, review the information displayed, then click I Agree.
On the Confirm Installation screen, click Install.
Now we can watch the installation being performed. But we’re not done yet.
Configuration of SUSE Linux
After the installation has been completed, we have to perform some configuration steps.
The first configuration you will be prompted with is for the Password for the System Administrator “Root” account. Provide a password and then click Next.
IMPORTANT: This is the most important thing to provide (and remember). The “Root” user account is equal to the Windows Local Administrator account.
On the Hostname screen, provide a name for the computer, and also provide a domain name, then click Next.
IMPORTANT: The domain name provided must NOT be a valid Active Directory domain name. Also ensure that the “Change Hostname via DHCP” option is NOT selected.
On the Network screen, make the appropriate changes as you require, then click Next.
In my lab example, I disabled the Firewall, enabled VNC Remote Administration,
On the Test Internet Connection screen, you can choose the option to “Yes, Test Connection to the Internet” or “No, skip this test“, then click Next.
In my lab example, my VMs are not connected to the Internet, so I chose to skip the test.
On the Network Services Configuration screen, click Next.
On the User Authentication Method screen, you can choose the Authentication Method that you want to use, then click Next.
In my lab example, I used the “Local (/etc/passwd)” option, since this setup is similar to the Windows “Workgroup” type setup.
On the New Local User screen, I am going to create a new account to use with SCOM monitoring, then click Next.
On the Release Notes screen, review the information, then click Next.
On the Hardware Configuration screen, click Next.
Now the installation/configuration is finally complete! Click Finish.
Now you can login to the new Linux installation. Login with the Root account that we setup.
If everything is setup and configured correctly, your home screen should look something like this.
Now that we have a UNIX / Linux system setup, in our next post of this series we will setup SCOM to be able to monitor Linux systems.


Comments on: "Monitoring Linux with SCOM 2012 R2 – Part 1: Installation and Configuration of Linux (SUSE) Virtual Machine" (2)
Looking forward to part 2!
Thanks! I try to post every week, usually on Fridays.